Archive note: Originally published on January 31, 2016. This tutorial preserves the original SnapKit 0.15.0 and historical Swift/UIKit APIs. It is not an installation guide for current toolchains. During migration, code line breaks, indentation, and code quotation marks were restored; the API examples were not modernized.

Hello iOS developer pals! You definitely know auto layout for coding. It seems to be complicated to do, doesn’t it? I super extremely proudly present SnapKit for easier and more clearly way to code.
About this How-to
- Build compelling user interfaces with SnapKit
- Use SnapKit building view with auto layouts constraints programmatically
- Step-by-step guide to create complete custom layout
Who this How-to is for
- iOS Developers who want to become proficient in auto layout
- Experienced iOS Developers who need try something new in auto layout
What you will learn & Get
- SnapKit Tutorial
- Plot dynamic layout using SnapKit.
- Get to know about SnapKit.
- Forget NSLayoutConstraint:P
- No worry for storyboard conflict.
- Readable code.
- You can adjust padding in your app just one click (Useful trick).
Let’s GO
Install SnapKit
We can install SnapKit via dependencies manages (Cocoapods, Carthage) or Embedded framework but now i’ll show you how to install SnapKit by Cocoapods. If this your first time using cocoapods just open Terminal and typing
$ sudo gem install cocoapodsGo to the your project directory from
$ cd project-pathMake new Podfile for your Xcode project
$ pod initOpen Podfile in Text Editor or open directly from terminal
$ open -e PodfileIntegrate SnapKit into your Xcode project, specify it in your Podfile
source 'https://github.com/CocoaPods/Specs.git'
platform :ios, '8.0'
use_frameworks!

target 'ProjectName' do
  pod 'SnapKit', '~> 0.15.0'
end
Then, run the following command for install SnapKit
$ pod installSuccess!! Now SnapKit integrated with your project, double click on yourproject.xcworkspace file to open Xcode
Usage
First thing you need to import SnapKit framework to your view controller by import statement
import SnapKitAlignment & Positioning
Let’s say we want to layout some UIButton that is constrained to it’s superview at the right bottom edges with 20pts.
let superview = self.view
let button = UIButton()
button.layer.cornerRadius = 33
button.setTitle("+", forState: .Normal)
button.backgroundColor = UIColor.blackColor()
superview.addSubview(button)

button.snp_makeConstraints { (make) -> Void in
    make.width.equalTo(66)
    make.height.equalTo(66)
    make.bottom.equalTo(superview.snp_bottom).offset(-20)
    make.right.equalTo(superview.snp_right).offset(-20)
}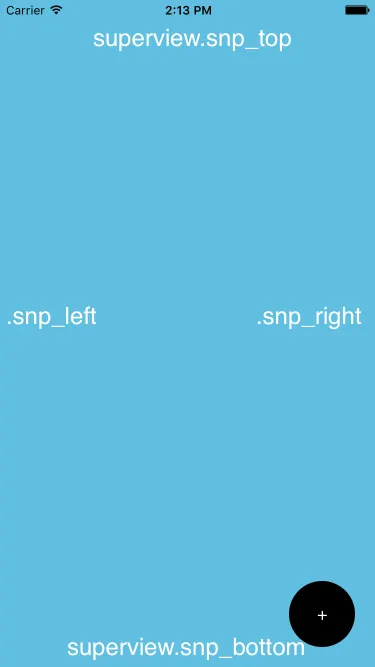
Align at Bottom Right edges with 20pts of superview
That is first example in this How-To, I want to explain the view attribute in SnapKit, it similar with NSLayoutAttribute you can align your custom layout easily.
This important method is snp_makeConstraints it will make constraints to your view.
yourView.snp_makeConstraints { (make) -> Void in
    // your constraints
}
Like that custom UIButton we want to stick the button at Bottom-Right of superview with spacing 20pts, we use view attribute of UIButton (bottom and right) for reference to view attribute of superview and use.offset(x) for set padding.
Below is the screen what we should do?
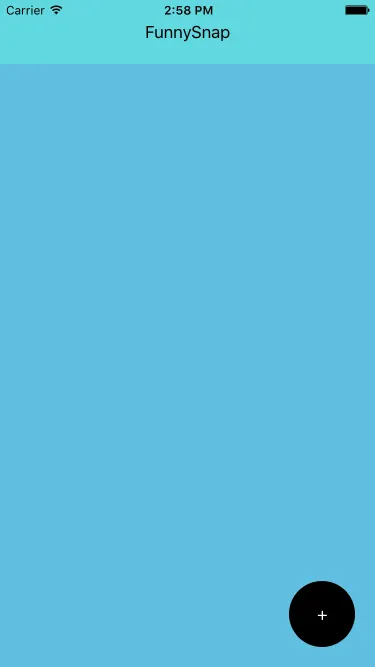
Custom Navigation bar by SnapKit
In the screen you can see custom navigation bar, this nav bar has UIView for background and UILabel for title. We want to stick custom nav bar on top of superview with height 64pts and width equal to superview and title label is embedded inside a UIView(Navigation bar) center. Try …
let superview = self.view
let navbar = UIView()
superview.addSubview(navbar)
navbar.backgroundColor = UIColor(red:0.38, green:0.85, blue:0.88, alpha:1)

navbar.snp_makeConstraints { (make) -> Void in
    make.height.equalTo(64)
    make.width.equalTo(superview)
}

let titleLabel = UILabel()
navbar.addSubview(titleLabel)
titleLabel.text = "FunnySnap"
titleLabel.textColor = UIColor.blackColor()
titleLabel.sizeToFit()

titleLabel.snp_makeConstraints { (make) -> Void in
    make.center.equalTo(navbar)
}
Finished!
You would know how to alignment and positioning already, then i’ll move on composition by SnapKit.
Composition
SnapKit can do easier way to create multiple constrains at the same time.
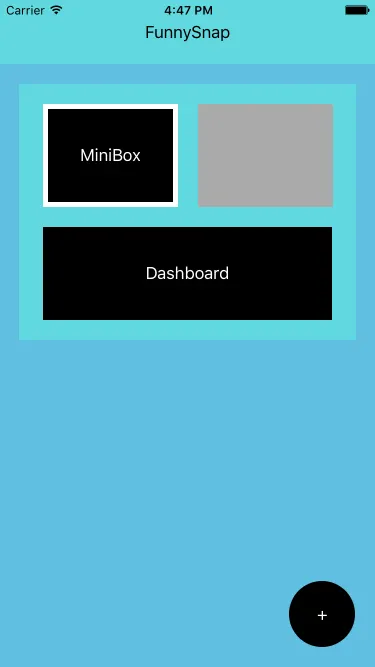
Edges, Size, Center
Edges: You can adjust size, position of view with.edges
miniLabel.snp_makeConstraints { (make) -> Void in
    make.edges.equalTo(miniView1).inset(UIEdgeInsetsMake(5, 5, 5, 5))
}Size: You can adjust size of view with.size
miniView2.snp_makeConstraints { (make) -> Void in
    make.size.equalTo(miniView1)
    make.left.equalTo(miniView1.snp_right).offset(20)
    make.top.equalTo(dashboardView).offset(20)
}Center: You can align subview to center refer by superview.
dashboarLabel.snp_makeConstraints { (make) -> Void in
    make.center.equalTo(bigView)
}
Done! In composition example i hope it will help you understand how to use edges, size, center.
Next… What we should do when we want to modify, remove, update constraint after animate or has something? Don’t worry, SnapKit give 3 different approaches to updating constraints.
References: You can assigning the result of a constraint make expression to a local variable, then you can remove and update that constraint when you want.
var widthConstraint: Constraint? = nil
var heightConstraint: Constraint? = nil

self.button.snp_makeConstraints { (make) -> Void in
    widthConstraint = make.width.equalTo(44).constraint
    heightConstraint = make.height.equalTo(44).constraint
    make.bottom.equalTo(self.view.snp_bottom).offset(-20)
    make.right.equalTo(self.view.snp_right).offset(-20)
}

// References
widthConstraint?.uninstall()
heightConstraint?.uninstall()
widthConstraint?.updateOffset(40)
heightConstraint?.updateOffset(40)
Migration review note: The original example above calls
uninstall()beforeupdateOffset(). This sequence is also present in the linked example repository and has been retained, not validated as a working update sequence. Treat removing and updating a constraint as separate operations to review before using this example in an app.
snp_updateConstraints: If you want to updating the constant value of the constraint you can use this method.
self.button.snp_updateConstraints { (make) -> Void in
    make.width.equalTo(66)
    make.height.equalTo(66)
    make.bottom.equalTo(self.view.snp_bottom).offset(-20)
    make.right.equalTo(self.view.snp_right).offset(-20)
}snp_remakeConstraints: this method is similar to snp_makeConstraint, but will first remove all existing constraints installed, code below will move my button to bottom-left of superview and resize to 44pts.
self.button.snp_remakeConstraints { (make) -> Void in
    make.width.equalTo(44)
    make.height.equalTo(44)
    make.bottom.equalTo(self.view.snp_bottom).offset(-20)
    make.left.equalTo(self.view).offset(20)
}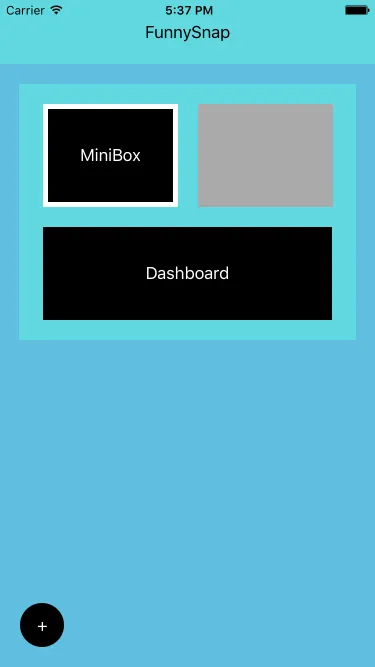
Move to Bottom-Left and resize to 44pts
Constraints Priority
In the Auto layout sometime your view should have priority for decision about adjust the position, size and other.
- .priority: allows you to specify an exact priority
- .priorityHigh: equivalent to UILayoutPriority.DefaultHigh
- .priorityMedium: equivalent to UILayoutPriority.DefaultMedium
- .priorityLow: equivalent to UILayoutPriority.DefaultLow
you can add priority on to the end of a constraint chain.
make.bottom.equalTo(self.view.snp_bottom).offset(-20).priority(500)
make.right.equalTo(self.view.snp_right).offset(-20).priorityMedium()
Recommend Trick
Sometime you want to see the result of interface after you added constraints to your view follow mock-up from designer, and then his want to change left-spacing of all element to 20 from 15 … hmmm What you should do?
It very easy to solve that problem and flexible to change left-spacing of all element by Global constant in Swift.
struct SpacingRule {
    static let Left = 20
    static let Right = -20
    static let Top = 20
    static let Bottom = -20
}

// Example
// make.left.equalTo(superView).offset(SpacingRule.Left)
// make.right.equalTo(superView).offset(SpacingRule.Right)
That good:D.
The example project is ready on Github, you can download here: Download
Hopefully, I think you will understand how to use SnapKit for solving auto layout problem. SnapKit also make your code to readable and decreases time to develop user interface as well.
Finally, what’s your opinion about SnapKit? You can leave your comment below. Let’s share idea!
Thank you.